Battery switch on travel trailer function is crucial for managing your RV’s power. Understanding how this simple yet vital component works can prevent frustrating breakdowns and keep your adventures rolling smoothly. This guide will walk you through everything you need to know, from basic operation and troubleshooting to advanced configurations and maintenance.
We’ll cover different battery switch types, their wiring, safety precautions, and how they interact with other systems like solar panels and converters. Whether you’re a seasoned RVer or just starting out, mastering your battery switch is key to a worry-free camping experience. Let’s dive in!
Understanding Battery Switch Functionality in Travel Trailers
A battery switch is a crucial component in any travel trailer’s electrical system, allowing you to control the flow of power from your batteries to the various appliances and systems within your RV. Understanding how it works is essential for safe and efficient use of your trailer. Properly managing your battery power can prevent unexpected drain and extend the lifespan of your batteries.
Battery Switch Purposes, Battery switch on travel trailer function
The primary purpose of a battery switch is to isolate or connect your trailer’s batteries to the electrical system. This allows you to disconnect the batteries completely to prevent drain when the trailer is not in use, protecting your batteries from damage. It also lets you switch between different battery banks if your setup has more than one. This is particularly useful for those with solar panels or generators charging a separate battery bank.
Furthermore, it provides a safety mechanism to prevent accidental short circuits during maintenance or repairs.
Types of Battery Switches
Several types of battery switches cater to different needs and setups. A single battery switch controls a single battery bank, commonly found in smaller trailers. Dual battery switches manage two separate battery banks, often used for larger trailers or those with separate house and starting batteries. Multi-bank switches, capable of managing three or more battery banks, are used in more complex setups with multiple power sources and demands.
These switches can be manual, requiring a physical switch to be flipped, or automatic, which uses sensors and relays to manage battery power automatically.
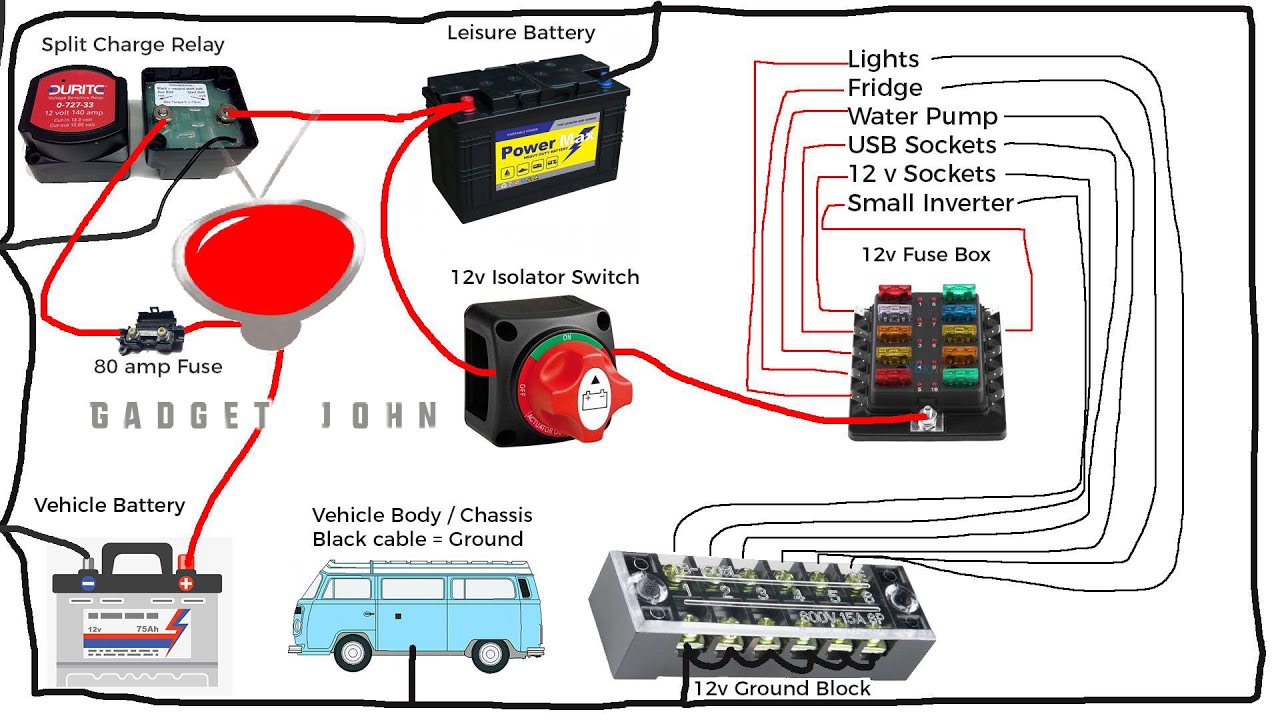
Typical Wiring Diagram of a Battery Switch System
A typical wiring diagram for a dual battery switch system shows the two batteries connected to the switch. From the switch, separate lines lead to the trailer’s 12-volt DC system, typically protected by fuses or circuit breakers. Each battery’s positive terminal connects to the switch, and the negative terminals are usually connected together directly. The switch itself then routes power to the various circuits in the trailer, such as lights, water pump, and other appliances.
A simple diagram would show two battery terminals (positive and negative for each), the switch itself with its various positions (e.g., OFF, Battery 1, Battery 2, Both), and the outgoing power lines to the trailer’s electrical system. More complex systems might include a third battery for solar panels, a generator, or a shore power connection, with additional connections to the switch.
Comparison of Battery Switch Types
| Feature | Single Battery Switch | Dual Battery Switch | Multi-Bank Battery Switch |
|---|---|---|---|
| Number of Batteries Controlled | One | Two | Three or more |
| Complexity | Simple | Moderate | High |
| Cost | Low | Medium | High |
| Applications | Small travel trailers | Larger travel trailers, separate house and starting batteries | Complex setups with multiple power sources |
| Advantages | Simple, inexpensive | Flexibility in power management, prevents cross-drain | Maximum flexibility, ideal for complex systems |
| Disadvantages | Limited functionality | More complex wiring | High cost, complex installation |
Operating the Battery Switch

Understanding how to properly operate your travel trailer’s battery switch is crucial for maintaining your power system and preventing damage. This section will guide you through the safe and effective operation of your battery switch, highlighting important precautions and the consequences of incorrect use.
So, you’re an audiophile who travels? Awesome! Check out this guide on building an audiophile travel setup for killer sound on the go. It covers everything from portable DACs to noise-cancelling headphones. But remember, even the best gear needs the right environment. For tips on managing listening fatigue and maintaining your mental well-being while on the road, consider this resource on audiophile travel setup and mental health.
Prioritizing your listening experience and your mental health is key to enjoying your travels to the fullest!
Safe Battery Switch Operation Procedures
Proper operation of your battery switch is straightforward, but attention to detail is essential. These steps will ensure safe and efficient power management.
- Identify the Switch: Locate your battery switch. It’s usually a multi-position switch, often found near your battery bank or inside a storage compartment. Familiarize yourself with its markings, which typically indicate “Off,” “Battery 1,” “Battery 2,” and “Both.”
- Start with the Switch Off: Before making any changes, always ensure the battery switch is in the “Off” position. This prevents accidental short circuits or power surges.
- Select the Desired Position: Carefully move the switch to the desired position (“Battery 1,” “Battery 2,” or “Both”). “Battery 1” connects only the first battery bank, “Battery 2” connects only the second, and “Both” connects both simultaneously.
- Check for Power: After switching, verify power to your appliances. If using only one battery, the other appliances will likely not function.
- Turn Off When Not in Use: When you’re finished using your trailer or if it will be stored for a while, switch the battery switch to the “Off” position to conserve battery life and prevent accidental discharge.
Safety Precautions When Using a Battery Switch
Working with batteries and electrical systems requires caution. Ignoring these precautions could lead to serious injury or damage to your equipment.
- Wear Protective Gear: Always wear safety glasses and gloves when working around batteries, as battery acid is corrosive.
- Avoid Sparks: Never use tools that could create sparks near the battery terminals or the switch itself. Sparks can ignite flammable gases released by batteries.
- Proper Ventilation: Ensure adequate ventilation when working with batteries to prevent the buildup of potentially explosive hydrogen gas.
- Disconnect Before Maintenance: Always turn the battery switch to the “Off” position before performing any maintenance on your electrical system or batteries.
- Consult a Professional: If you’re unsure about any aspect of operating or maintaining your battery switch or electrical system, consult a qualified RV technician.
Consequences of Incorrect Battery Switch Operation
Improper operation of the battery switch can have several negative consequences.
Incorrect switching can lead to unintended power drains, damaging your batteries. For example, leaving the switch in the “Both” position while the trailer is unused will rapidly deplete both batteries. Moreover, accidentally short-circuiting the system by manipulating the switch incorrectly can cause sparks, potentially igniting flammable gases or damaging electrical components. In the worst-case scenario, this could lead to a fire.
Finally, consistent improper use can shorten the lifespan of your batteries and other electrical equipment.
Battery Switch Operation Flowchart
A visual representation of the correct procedure is helpful. Imagine a flowchart with four boxes:
Box 1: “Switch OFF?” An arrow points to “YES” leading to Box 2, and “NO” leading back to “Switch OFF?” indicating the need to turn the switch off first.
Box 2: “Select Desired Position (Battery 1, Battery 2, or Both).” An arrow points to Box 3.
Box 3: “Check Power.” An arrow points to Box 4.
Box 4: “Finished? If yes, Switch OFF. If no, return to Box 2.” The “Switch OFF” arrow loops back to Box 1, creating a cyclical process.
Troubleshooting Common Battery Switch Issues: Battery Switch On Travel Trailer Function
Dealing with a malfunctioning battery switch in your travel trailer can be frustrating, but systematic troubleshooting can usually pinpoint the problem. Understanding the different components and their roles is key to effective diagnosis. Remember safety first – always disconnect the battery before working on the electrical system.
Common Battery Switch Problems and Troubleshooting Steps
A few common issues can arise with your travel trailer’s battery switch. These often manifest as a complete lack of power, intermittent power, or blown fuses. Let’s explore these issues and how to troubleshoot them.
So, you’re an audiophile who travels? Awesome! Check out this guide on creating the perfect audiophile travel setup for amazing sound on the go. It covers everything from portable DACs to noise-cancelling headphones. But what about maintaining your mental wellbeing while traveling with all this gear? That’s where understanding a mindful approach to your audiophile travel setup comes in.
Remember, prioritizing your mental health is key to enjoying your audiophile adventures!
- No Power: This is often the most concerning issue. First, check the obvious – are the batteries themselves charged? Use a multimeter to test the voltage of each battery. If the batteries are low or dead, recharge them. If they’re charged and you still have no power, check the fuses both in the switch itself (if it has any) and at the main distribution panel.
Replace any blown fuses with the correct amperage. If the fuses keep blowing, there’s likely a short circuit somewhere in your wiring, requiring more detailed inspection by a qualified technician. Finally, verify that the switch is correctly set to the position supplying power to your trailer.
- Blown Fuses: Repeatedly blown fuses indicate a short circuit. Before replacing the fuse, thoroughly inspect the wiring for any damage, chafing, or exposed wires. Look for any signs of water damage, which can cause shorts. If you find damage, repair it before replacing the fuse. If the fuse blows again immediately after replacement, there’s a more serious problem that needs professional attention.
- Intermittent Power: This can be tricky to diagnose. It often points to a loose connection somewhere in the system. Start by checking all the connections at the battery, the switch, and the distribution panel. Tighten any loose screws or terminals. Inspect the wiring for any corrosion or damage that might be causing intermittent contact.
A faulty switch itself is another possibility, requiring testing (described below).
Testing the Battery Switch
Testing your battery switch ensures it’s functioning correctly and isn’t the source of your power problems. You’ll need a multimeter for this.
First, disconnect the batteries. Then, use the multimeter to test the continuity across the switch terminals. Set your multimeter to the continuity setting (often symbolized by a diode or a “beep” function). With the switch in the “off” position, there should be no continuity (no beep). When you switch it to the “on” position, there should be continuity (a beep).
Lack of continuity in either position indicates a faulty switch that needs replacing. Remember to always double-check your multimeter settings and connections to ensure accurate readings.
Proper testing requires understanding your specific battery switch model and its wiring diagram. Consult your trailer’s manual for specific instructions.
Battery Switch Maintenance and Replacement
Keeping your travel trailer’s battery switch in good working order is crucial for reliable power. Regular maintenance prevents problems and extends the lifespan of the switch, saving you time and money in the long run. Neglecting maintenance can lead to premature failure and potentially leave you stranded without power.
Regular Battery Switch Maintenance
A simple maintenance schedule can significantly improve the longevity of your battery switch. This involves visual inspections and occasional cleaning. It’s not a complex process, but it’s an important one.
- Visual Inspection (Monthly): Check the switch for any signs of corrosion, loose connections, or physical damage. Look closely at the terminals and the switch housing itself. Corrosion can impede current flow and eventually lead to failure.
- Cleaning (Quarterly): Use a wire brush or sandpaper to clean any corrosion from the terminals. A battery terminal cleaner spray can also be helpful. After cleaning, apply a thin layer of dielectric grease to the terminals to prevent future corrosion. This protects the metal and ensures a good electrical connection.
- Operational Test (Annually): Cycle the switch through all its positions several times to ensure smooth operation. Listen for any unusual noises or resistance. If you notice anything amiss, further investigation may be necessary.
Replacing a Faulty Battery Switch
If your battery switch is malfunctioning – exhibiting signs like intermittent power, complete power failure, or excessive heat – replacement is necessary. Replacing the switch is generally a straightforward process, but safety precautions should always be taken.
Selecting a Replacement Battery Switch
Choosing the right replacement battery switch is essential. Several factors need to be considered to ensure compatibility and safe operation.
- Amperage Rating: The new switch must have an amperage rating equal to or greater than the original switch. This ensures it can handle the current draw of your trailer’s electrical system. Check your original switch for its amperage rating. A higher amperage rating provides a safety margin.
- Number of Batteries: The switch should accommodate the number of batteries in your system (typically two, but could be more). Ensure the new switch has the correct number of terminals.
- Type of Switch: There are various types of battery switches, including those with different configurations for connecting and isolating batteries. Choose a replacement that matches your existing setup. Consider features like a built-in voltmeter for easier battery monitoring.
- Mounting Style: Ensure the replacement switch has a compatible mounting style for your existing installation. The dimensions and mounting holes should align with the old switch.
Connecting a New Battery Switch
Replacing the battery switch involves disconnecting the old one and installing the new one. Safety is paramount during this process. Always disconnect the negative battery terminal before working on the electrical system.
- Disconnect Batteries: Disconnect the negative (-) terminal from both batteries.
- Remove Old Switch: Carefully remove the old battery switch, noting the wiring configuration before disconnecting any wires. Take pictures if necessary.
- Install New Switch: Mount the new switch securely in its designated location. Make sure it is firmly attached and that the mounting hardware is properly tightened.
- Reconnect Wires: Connect the wires to the new switch, matching the configuration of the old switch. Double-check all connections for tightness and correct polarity.
- Reconnect Batteries: Reconnect the negative (-) terminal to both batteries. Then, connect the positive (+) terminal to both batteries.
- Test the Switch: Test the switch by cycling through all its positions, ensuring that power is correctly routed to the various circuits.
Advanced Battery Switch Configurations and Upgrades
Upgrading your travel trailer’s battery system beyond a simple single-battery setup can significantly improve your camping experience. This involves considering multiple batteries, different voltage systems, and more sophisticated switching mechanisms. These upgrades offer increased power capacity and flexibility, but also come with added complexity and cost.
Choosing the right advanced battery system depends heavily on your power needs and budget. Factors like the size of your trailer, the number of appliances you use, and the length of your trips will all influence your decision. Let’s explore some of the common options and their implications.
Multiple Battery Systems
Many RVers opt for multiple batteries to extend their off-grid power capabilities. This setup typically involves two or more 12-volt batteries, often connected in parallel to increase amperage (capacity) or in series to increase voltage (for higher-voltage appliances). Properly managing these batteries requires a more advanced switch, capable of isolating, combining, or charging individual batteries independently.
- Parallel Connection: This increases the overall amperage-hour (Ah) capacity, meaning you can run your appliances for longer periods before needing to recharge. For example, two 100Ah batteries in parallel provide 200Ah of capacity.
- Series Connection: This increases the voltage, which is necessary for some appliances designed to operate at 24V or higher. Two 12V batteries in series provide a 24V system.
- Combined Parallel and Series: More complex systems might use a combination of parallel and series connections to achieve a desired voltage and capacity. For instance, four 12V batteries could be arranged in two parallel pairs, with each pair connected in series to create a 24V system with increased capacity.
Different Voltage Systems
While most travel trailers operate on a 12V system, some are designed for higher voltages, such as 24V or even 48V. These higher voltage systems are more efficient for transmitting power over longer distances, reducing voltage drop and improving the performance of high-power appliances. The choice between 12V and higher-voltage systems is a trade-off between cost, complexity, and efficiency.
- 12V Systems: These are the most common and generally less expensive. They are well-suited for most RV applications.
- 24V Systems: Offer improved efficiency for long runs of wiring and higher-power appliances. They require specialized components, such as 24V inverters and chargers.
- 48V Systems: Even more efficient than 24V systems, but significantly more complex and expensive to implement. They are often found in larger RVs or those with exceptionally high power demands.
Examples of Advanced Battery Switch Systems
Several types of advanced battery switches are available, each offering different levels of control and functionality.
- Intelligent Battery Switches: These switches automatically manage the charging and switching of multiple batteries, optimizing battery health and maximizing power availability. They often incorporate features like automatic equalization charging and low-voltage protection.
- Remote Battery Switches: These allow you to control the battery system from a convenient location inside the RV, eliminating the need to access the battery compartment frequently.
- Digital Battery Monitors: These provide real-time monitoring of battery voltage, amperage, and state of charge, allowing you to make informed decisions about power usage and charging.
- Battery Combiner Systems: These systems combine multiple batteries into a single power source, simplifying the wiring and improving efficiency. They typically include safeguards to prevent overcharging and discharging.
Mastering your travel trailer’s battery switch is a game-changer for reliable power management. From understanding the different types and their functions to troubleshooting common issues and performing routine maintenance, you’re now equipped to keep your RV’s electrical system running smoothly. Remember safety first – always disconnect power before working on any electrical components. Happy travels!
FAQ Resource
What happens if I leave my battery switch in the “off” position for an extended period?
Leaving the switch off for too long won’t damage the switch itself, but your house batteries will likely discharge due to parasitic draws (small amounts of current used even when devices are off). This can lead to a dead battery.
Can I use a battery switch to isolate a single battery in a dual-battery system?
Yes, most dual battery switches allow you to isolate each battery individually, giving you control over which battery is powering your trailer and which is charging.
How often should I inspect my battery switch?
Regular visual inspections are recommended, at least once a year, checking for corrosion, loose connections, and any signs of damage. If you notice anything unusual, address it promptly.
My battery switch is making a clicking noise. What could be wrong?
A clicking noise often indicates a problem with the switch itself, a low battery voltage, or a blown fuse. Check your fuses first and then consider replacing the switch if the problem persists.
